The Battle for Rorke’s Drift. Any serious student of military history recognizes the name. However, most of us don’t know the details. The Rorke’s Drift scrap had all the elements of a heroic last stand. The defenders were lyrically outnumbered, the cavalry was not coming in the nick of time, and defeat meant a horrible, gory death. The argument could be made that the only reason the British prevailed was due to their legendary tactical acumen and a particularly remarkable rifle.
Rorke’s Drift – The Epic Battle Where Martini-Henry Rifle Shined
The battlefield was the mission station at Rorke’s Drift during the Anglo-Zulu War. This was actually a footnote to the larger British defeat at the Battle of Isandlwana on the morning of 22 January 1879. Isandlwana was only the second major engagement of the war, taking place a mere eleven days after British forces invaded the Zululand Empire. Despite being severely outgunned, a Zulu force of some 20,000 warriors fell upon a column of 1,800 British and colonial troops. Even though the British forces were equipped with modern breechloading rifles, a pair of 7-pounder mountain guns, and a Hale rocket battery, the enraged Zulus nonetheless overwhelmed and slaughtered them. When dusk fell, some 1,300 British troops lay dead.
Advertisement — Continue Reading Below
Once the bloodshed abated at Isandlwana, a substantial contingent of Zulu warriors broke off and headed for Rorke’s Drift. Information moved glacially in this place at this time, so tactical details were sketchy. However, once the two sides faced off, it was 150 British and colonial troops arrayed against between 3,000 and 4,000 Zulus. As the Brits lacked the artillery assets they had at Isandlwana, it looked like it was going to be yet another epic slaughter.
Tactical Details
The mission station at Rorke’s Drift was a branch of the Church of Sweden. Originally a trading post run by James Rorke, that’s where the place got its curious name. The term drift refers to a ford in a river, in this case, the Mzinyathi. This river described the boundary between British Natal and the Zulu Kingdom. As is so often the case, it was the vagaries of geography that transformed this pastoral land into a bloody killing field. Due to its strategic location, the mission station had been amply supplied with provisions and, more importantly, stockpiled ammunition.
Advertisement — Continue Reading Below
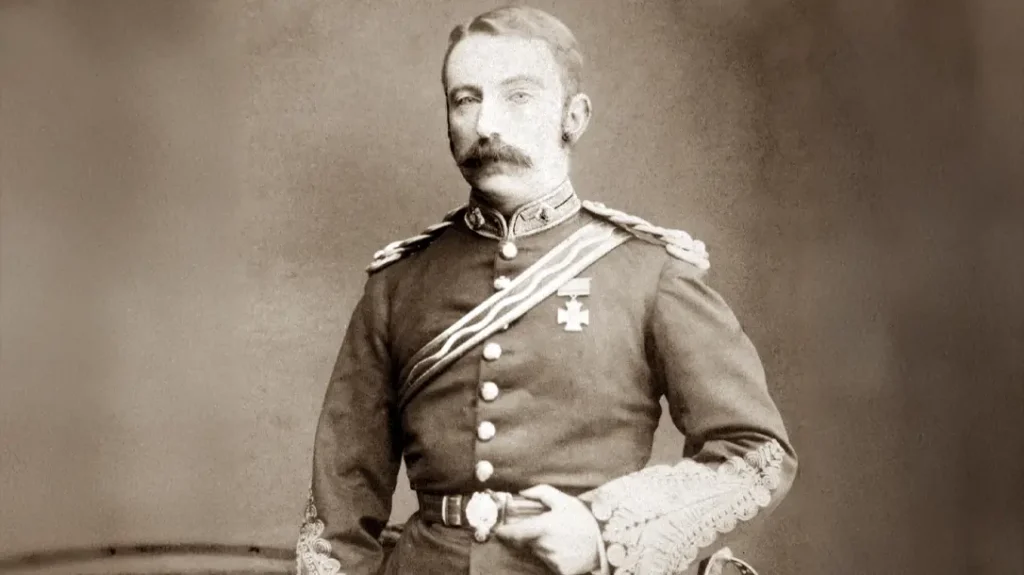
The detachment at Rorke’s Drift was commanded by a pair of young officers, Lieutenants John Chard and Gonville Bromhead. While Chard was nominally the senior officer present, both men coordinated the defense of the station. Having been an Army Lieutenant myself, I am in awe of how well these two inexperienced soldiers comported themselves.
Survivors
In the lead-up to the fight, two bedraggled survivors of Isandlwana arrived at the station with a cursory report of the shocking defeat. Bromhead and Chard subsequently held a confab with Acting Assistant Commissary James Dalton to discuss the possibility of a retreat.
However, Rorke’s Drift also housed a hospital. Burdened as they would inevitably be with their invalids, these officers appreciated that there was no way they could escape the Zulus they knew to be coming. Considering a hasty defense in open country would be tantamount to suicide, they began to transform the humble mission station into a fortified redoubt.
Advertisement — Continue Reading Below
Once they realized that escape was not an option and help would not be forthcoming, the British launched into their defensive preparations with verve. Their very lives depended upon how well they performed. The officers had their men prepare a defensive perimeter out of their bulk rations, something they called mealie bags. They also knocked firing ports out of the walls of the station’s buildings.
The Enemy
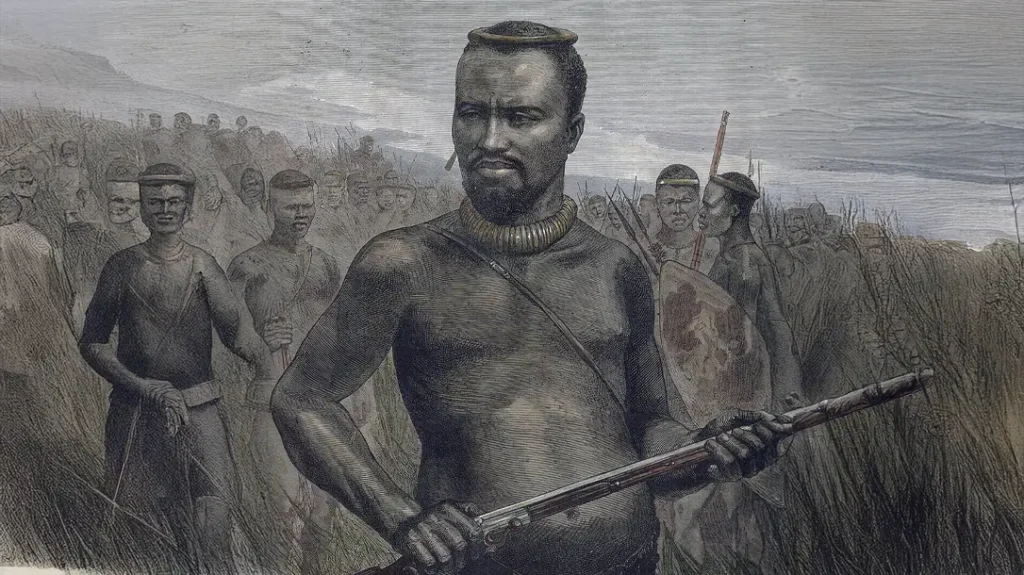
While the British held a significant technological edge over the attacking Zulus, the native force was far from a simple maniacal mass of savages. Deftly led by Prince Dabulamanzi kaMpande, this Zulu unit was referred to as the “loins” of the larger force that had bested the British at Isandlwana. In western parlance, this was the unbloodied reserve force. They called themselves the Undi Corps. The Corps consisted of the uDloko, uThulwana, and inDlondo amabutho (regiments). These warriors were predominantly married men between the ages of 30 and 50. They also included the inDlu-yengwe ibutho of young single men for a total of between 3,000 and 4,000 troops.
Advertisement — Continue Reading Below
The typical Zulu warrior carried a vicious short spear called an assegai as well as a cowhide Nguni shield. A modest contingent was also equipped with an amalgam of captured British weapons and antiquated muskets. However, they had very limited ammunition, and their experience with the weapons was minimal compared to the well-drilled Brits. Despite this fact, Zulu rifle fire eventually claimed roughly a third of the British dead in the subsequent battle.
The Fight
Battle was joined at 1620 hours on 22 January 1879, later the same day as the defeat at Isandlwana. A small contingent of colonial troops who had survived the Isandlwana massacre briefly engaged the superior Zulu force at Rorke’s Drift before fleeing on horseback. Their loss left a substantially weakened perimeter. Tensions were so high that a few of the remaining defenders actually fired on the retreating cavalry unit, killing a Corporal named William Anderson.
Advertisement — Continue Reading Below
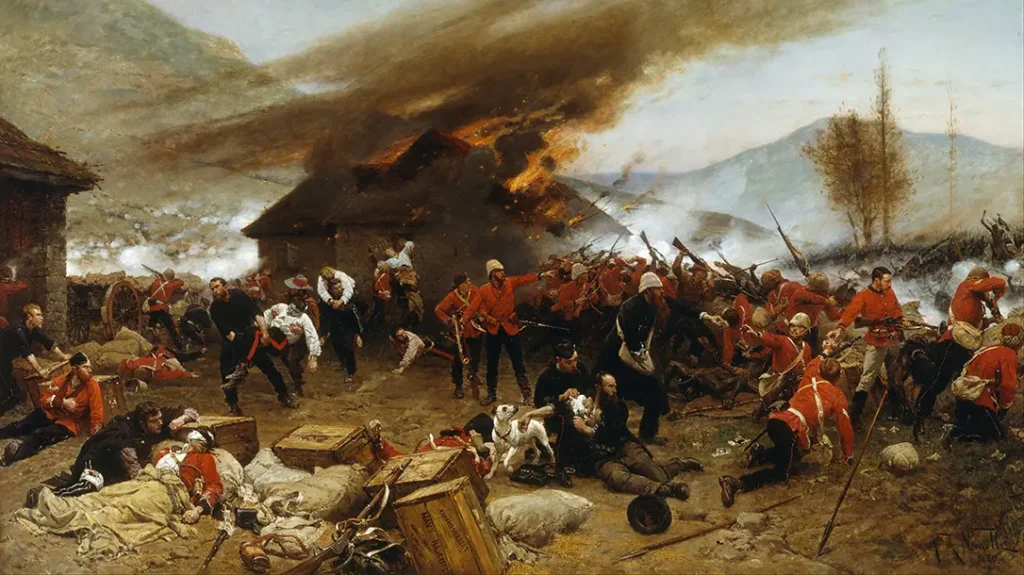
There remained around 155 troops, 39 of whom were pressganged out of the hospital in various stages of illness and injury. The Zulu commander divided his forces and attacked along multiple axes. The British opened fire at a range of around 450 yards. The British Army was legendary for its discipline under fire, and this was on glorious display at Rorke’s Drift. The Zulus suffered horrendous casualties, yet still they pressed the attack. They eventually resorted to clambering over the dead bodies of their comrades to breach the makeshift defenses. Once the combat became a close-quarters melee, the British employed their revolvers. Much of the intimate action was either hand-to-hand or decided at the tip of the bayonet.
Room to Room Fighting
The fight soon devolved into a room-to-room scrap. At such close quarters, the Zulus’ short spear was devastating. Along the way, the hospital building was ultimately set alight. This led to a desperate evacuation of the wounded.
The Zulus pressed their attack throughout most of the night, fighting by the light of the flames from the burning hospital. By the following day, fourteen British troops were dead and most everyone was wounded. Of the 20,000 rounds of ammunition with which they began the battle, only 900 cartridges remained. The defenders were utterly exhausted.
Advertisement — Continue Reading Below
On the morning of the 23rd, the Zulus simply disappeared, leaving behind hundreds of dead and wounded. Small enemy units put in an appearance or two that day, but none engaged. Three more severely injured colonial troops ultimately succumbed to their wounds.
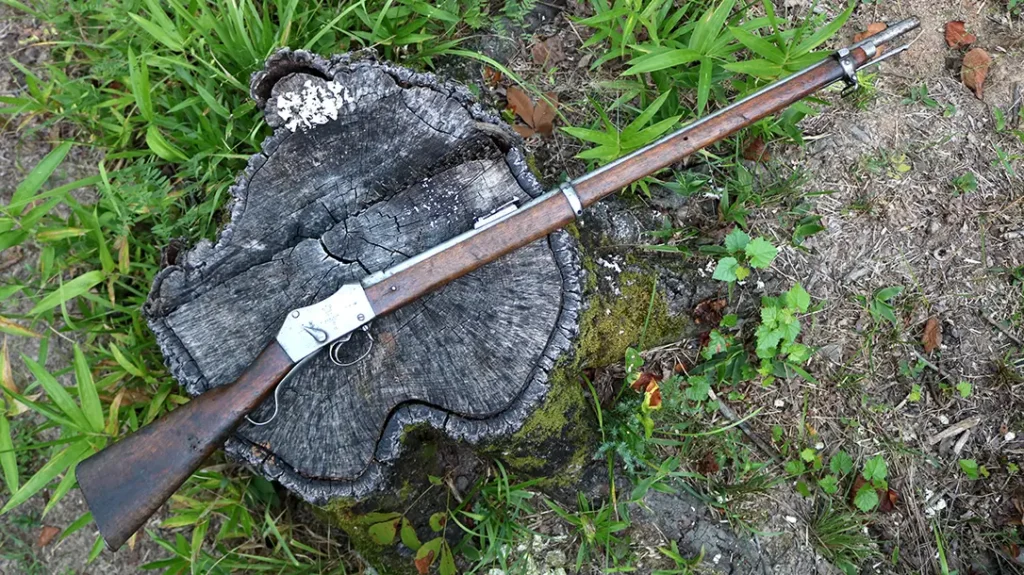
The Rifle
British grit and training played an outsized role in the survival of the colonial contingent at Rorke’s Drift. However, an equally important part was the remarkable Martini-Henry rifle they carried. A single-shot, cartridge-firing breechloader, the Martini-Henry allowed these well-disciplined British troops to pour concentrated fire into the attacking Zulu formations. It was this devastating firepower that ultimately turned the tide.
The Martini-Henry first saw service in 1871 and was gradually upgraded over time. The weapon soldiered on in British service through the end of World War 1. The Martini-Henry action was based upon the falling block design of the Peabody rifle, upgraded by Swiss arms designer Friedrich von Martini. The resulting weapon also incorporated polygonal rifling in its barrel, pioneered by a Scotsman named Alexander Henry.
.577/.450 Cartridge
Martini-Henry rifles fired a .577/.450 cartridge that began as a .577-caliber Snider case necked down to .45. These rounds pushed a round-nosed, tapered, hollow-based .452-inch 485-grain lead bullet. These massive projectiles were wrapped in a paper patch to ensure a tight seal in the bore and to prevent chemical interference between the black powder and the brass case.
The bullet was held in place with two crimped cannelures. Each cartridge included two fiber or mill board disks followed by a beeswax wad, yet another card disk, and then a cotton wool filler. Propellant was 85 grains of No.6 coarse black powder. The end result was utterly filthy and produced some prodigious recoil.
Large Round
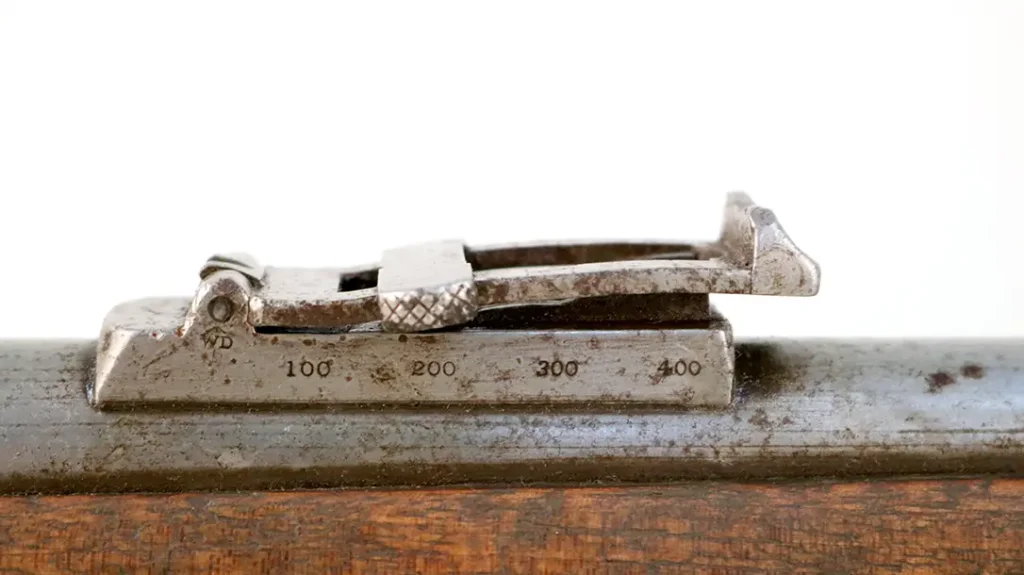
The Mk II Martini-Henry was the particular weapon used in the Zulu Wars. These guns sported rear sights graduated for long-range volley fire. The standard of accuracy was an average deflection of 27 inches for twenty rounds fired at 1,200 yards. Early cartridges were formed from flimsy, rolled brass that resulted in stoppages after protracted firing. Subsequent rounds were made from drawn brass, as is the case today, and were much more reliable. These big finger-sized cartridges produced truly horrific wounds.
The Martini-Henry is a lever-action, striker-fired, single-shot rifle. Later models had a longer lever that offered greater leverage in the event the action got sticky. The Martini-Henry had no manual safety. The teardrop-shaped widget on the right side of the weapon was an indicator that allowed the operator to ascertain the state of the striker by feel, even in the dark.
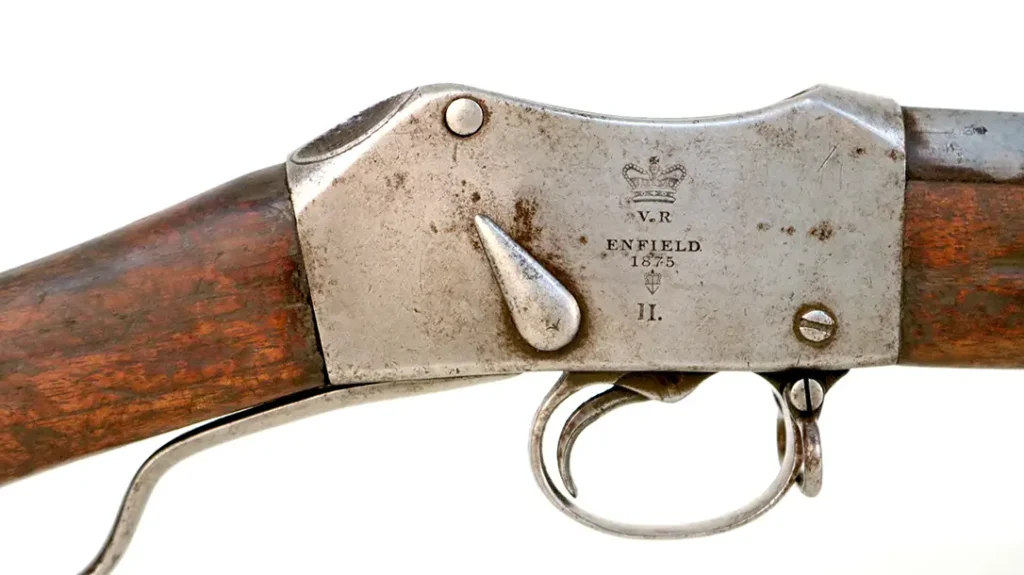
This Particular Example
The Mk II Martini-Henry rifle we reviewed for this project is a 1877 model with a curious story. It was captured in Afghanistan by a Special Forces warrant officer and then legally shipped back home. While Uncle Sam is absolutely draconian about modern weapons brought back as war trophies, true antiques such as this are still on the menu.
The British fought in Afghanistan during three discrete periods from 1839 to 1842, 1878 to 1880, and then in 1919. Stigmata of British involvement obviously persist there into the modern era. Afghanistan consumes armies like some kind of geopolitical monster and has seen more than its share of war. This particular British service rifle obviously dates back to the 1878-1880 conflict. If only it could talk…
The Rest of the Story
The Battle for Rorke’s Drift produced an amazing eleven Victoria’s Crosses. The Victoria Cross is Great Britain’s highest award for valor, the equivalent of our own Medal of Honor. The ultimate butcher’s bill was seventeen dead and fifteen grievously wounded colonials. The Zulus suffered 351 confirmed killed and a further 500 wounded. It was a grisly fight for both sides.
The Zulus had a well-deserved reputation for torturing and mutilating captives. As a result, British soldiers mopping up after the battle more often than not simply shot or bayonetted the enemy wounded. Some of them were actually buried alive alongside the dead.
Outnumbered forty-to-one, the British defenders fought like lions while, for the most part, retaining their sense of discipline under heavy assault. They eventually exacted twenty enemy dead for every colonial killed. In so doing, they earned a place in the storied annals of British military prowess.
WHY OUR ARTICLES/REVIEWS DO NOT HAVE AFFILIATE LINKS
Affiliate links create a financial incentive for writers to promote certain products, which can lead to biased recommendations. This blurs the line between genuine advice and marketing, reducing trust in the content.